Showing posts with label Tips and Tricks. Show all posts

Unblock Website URL on Facebook - 200% Working Guaranteed

Unblock your Website URL on Facebook - 200% Working Guaranteed ✌✌. Today I am going to share 200% Working Trick with all. if you have already tried the previous Trick I have shared here.
Then tried today trick that has shared below in this post. I assured you that you will get unblock your website URL because I have used this trick to unblock mine website on facebook. 


Friends, I can understand, how it is painful when you can't get traffic from Facebook for your website article. I have written this 👉 How to post a blocked URL or unblock your website on Facebook! 👈article to help you to unblock your website URL on Facebook. If you follow all above given steps and And it's been more than 10 days now. Still, your website is not approved as an unblocked website.

I have a great Trick for you It will work for 200%. Because I have tried this trick for my website - https://www.bongopratidin.com.

Follow 3 Steps given below for unblock website URL on Facebook. ✌👆👈

Friends, you have to convenience Facebook Team that your website doesn't have only safe content for its users. You never spam on Facebook. Here are the steps of this trick. Hope you get solution.

Step 1 👉 Get share of your article.
Ask 3 and 4 friends to share any one article of your website to their Facebook timeline.
If anyone shares your article.
They will get a popup like its spam or get nothing.
but after a few minutes ask them to check their notification.
Notification will be like this 👇 See the picture below.

Unblock website URL on Facebook - Notification


Step 2 👉- Click on Notification in notification bar.
Now tell Friends to click on notification like in above given image.
After clicking this notification you will be diverted to a new page.
You got this message "This post goes against our Community Standards on spam".  See the image given below. 
Don't worry about it and just follow the steps as I have conveyed. 

Unblock website URL on Facebook by Request review
Step 3 👉-Click on "Request Review" Button.
Now Ask your Friends to "Request Review" like above-given image. 
Just click on the Request Review button for Review the shared blocked URL. 
After "Request Review" you have to wait about 24 hours to 1 week. 
If takes a long time don't panic. Just have patience and wait for Facebook reply.
Unblock URL on Facebook - under review

Random Questions are being asked on Facebook regard website URL blocked.:

1. How to unblock Domain Link / website URL on Facebook?
Ans.: with the help of these trick you can unblock your Domain URL.

2. Unblock Website URL from Facebook?
Ans.: Use Second Trick if First trick doesn't give the result.

3. My Website URL blocked By Facebook | How To Unblock?
4. how to get unblock your website on Facebook?
5. How to unblock a website on Facebook?
6. How unblock my website on Facebook?
7. Facebook blocked my website?
8. How to post blocked website post or content?
9. how to unblock website from Facebook?
10. how to unblock website from Facebook?
Ans.: For get the solution of above given question, You will have to try above mention tricks. I assured you that you will definitely get a solution after use of these tricks

My words:with the use of above-given steps you will get unblocked your website on Facebook. hope you will not appreciate my work and give your feed in the comment box.

How to unblock Domain / Website URL on Facebook! (100% Working) | Bangla Tech Jagat


How to unblock your website on Facebook? 

How to post a blocked URL or unblock your website on Facebook! (100% Working): Facebook is the social platform that has higher no of the user with high responsibilities. It is becoming an ecosystem so that Facebook improve its policies for its user security. Now a day's most of the people invest 30%-50% of the time on social media. Due to lots of users, Facebook gets aware of the misuse of its services that are free for everyone on this globe.
Here is solution to unblock your website URL on Facebook. Unblock your Domain from Facebook by follow the steps.

Lets understand, Why website have blocked. 

Now we discuss, why a website URL blocked on Facebook. or Why user have been prohibited to share its website links on Facebook page timeline. These questions come with the answer. A website like Facebook comes with lots of functionality that takes action automatically. This is called Artificial Intelligence.

Reason Behind Website Being Blocked.

We all know that Facebook and many other website has changed there policies. After these Policies changes, the unsafe website has started to be blocked. Facebook has taken this step to strengthen its user security.  In this process, some safe website URL has also blocked. The reason behind this would be the wrong reporting. I mean, This would have happened because a stranger reported your website on Facebook as spam. This is my guess. But There have no one who blocks your website URL manually or prohibited you by sharing your website URL. It's a machine program that gets instruction provided by you and design by Facebook developers team. If you try to act smart and share your website URL in a comment or others timeline or other pages or own pages continuously its being recognize as spam or misleading content.

Find the place where you get all solution related to Facebook. it is Facebook Help Center

Steps to unblock website URL on Facebook.

  1. Go to the Facebook Help Center to find.
  2. Visit the Facebook Sharing Debugger page.
  3. Enter your website URL in sharing debugger fill box and press debug button.
  4. Now you get the message "We can't review this website because the content doesn't meet our Community Standards. If you think this is a mistake, please let us know."
    facebook sharing debugger - unblock website url on facebook
  5. Now Click on "let us know" on this page. 
  6. Now you are at Facebook Block Page. Here you can request Facebook to unblock your website.
    Facebook Blocks Page - unblock website url on facebook
  7. Now write an application to unblock your website URL. 
  8. Submit it by click on the Send button.
  9. Now, wait until 24 hours as this request telly by Facebook team. and hope for a positive result. 
 you can find below an application format for unblocking your website on Facebook.

Application Format to unblocks website URL on Facebook. 

Good Morning Facebook!
With due respect, I would like to inform you my website URL have been blocked on Facebook. Recently I got know my website URL: https://www.yourwebsitenamehere.com has blocked on Facebook and prohibited me to share my website links over my pages and my timeline.
I didn't go against your policies. I apologize If I have broken any Facebook policy by any mistake.
It is requested please unblock my website URL and enable its links. I thank Facebook Team for making it a safe place for all.!
Please Unblock my website.
URL:  https://www.yourwebsitenamehere.com
Thanks in Advanced.
Manish Kumar

Questions are being asked on Facebook regard website URL blocked.

  • My Website URL blocked By Facebook | How To Unblock?
  • how to get unblock your website on Facebook?
  • How to unblock a website on Facebook?
  • How unblock my website on Facebook?
  • Facebook blocked my website?
If you have already tried the above-given Trick. Then tried this trick that has shared below in this post. 👇

My Words: Hello guys, I hope this article will help you and you will again get access to sharing your website links on Facebook. If you have still any query then let me know by a comment on this post.

How to install fonts in Windows Computer and backup already installed fonts?


In this post, we will see how to install fonts on Windows computer and also how to backup existing fonts from Windows computer.

To use any font, it has to be installed first. After which, the font can be used in programs such as Microsoft Word or Photoshop etc.

How to install fonts in Windows Computer ?
Watch this short demo on how to install fonts or backup fonts on Windows Computer:

Step One: Get T fonts downloaded to your computer.
To get fonts, just Google for "Fonts Download" and you should be able to get plenty of websites to download from. You can also try Google Fonts.

Step Two: Extract
Most fonts downloaded from the internet will be a ZIP file containing the font files. They would have normallu .TTF or .OTF file extensions.

Extract the ZIP files. You can either install the fonts individually or move all the fonts into a single folder.

Step Three: Open Control Panel \ All Control Panel Items \ Fonts
Copy and paste the font files here and it will get installed.

Step Four: Verify
Open applications such as Notepad or Word or Photoshop and new fonts are installed.

You can now start using the new fonts installed.

How to backup fonts already installed on your computer?

In case you want to backup the fonts installed on your computer, you can do so.

Step One: Open Control Panel \ All Control Panel Items \ Fonts or C> Windows> Fonts

Step Two: Copy the fonts you need or simply do CTRL + A to copy all

Step Three: Paste the fonts into another folder

How to Setup Fingerprint Lock on WhatsApp | Bangla Tech Jagat


  1. You can now add a fingerprint lock to WhatsApp on Android
  2. You can unlock the app with your fingerprint
  3. No need to use third-party apps to add this any more

Over the past few months, WhatsApp has rolled out a bunch of new updates for both Android and iOS. One of these new updates lets you add a fingerprint lock to WhatsApp. This means that you can't access WhatsApp chats without unlocking the app via a fingerprint saved on the phone. Of course, you need a smartphone with a fingerprint sensor for this to work and the latest version of WhatsApp. Fingerprint lock on WhatsApp for Android works with phones that have a capacitive fingerprint sensor, and those that have an in-display fingerprint sensor. In this article, we will describe how to add a fingerprint lock to WhatsApp on Android.
Now, this feature has been available on WhatsApp for iPhone since February this year, and it first appeared in a beta build for WhatsApp's Android users back in August.
Here's how to set up WhatsApp fingerprint lock on your Android smartphone.
How to set up fingerprint lock on WhatsApp for Android
Before proceeding, make sure you have installed WhatsApp version 2.19.221 or above by heading over to the WhatsApp page on Google Play. Once that is done, simply follow these steps to secure your WhatsApp chats on Android with fingerprint authentication.
1. Open WhatsApp > tap the vertical three dots icon on the top-right and go to Settings.
2. Go to Account > Privacy > Fingerprint Lock.
3. On the next screen, turn on Unlock with Fingerprint.
4. Additionally, you can also set the duration after which you'll have to use your fingerprint to unlock WhatsApp. It can be set to Immediately, After a minute or After 30 minutes.
5. Further, you can also choose if you want to show the message content and sender in the notifications or not.
Now whenever you open WhatsApp, depending on the automatic lock duration you've set, you will need to apply your fingerprint to unlock the app. And that's how you can set WhatsApp fingerprint lock on your Android smartphone.

How to export data from a single table and import into single table using phpMyAdmin? | Bangla Tech Jagat


There may be times when you need to export data from a single table and import it into a single table using an existing database phpMyAdmin.  In this post, we will discuss how to export data from a single table and import into a single table using phpMyAdmin?

Here is a scenario when such an activity may be needed for better understanding. This is from my practical experience.

So, there is this WordPress website we had, and the theme has to be customized. Since we did not want to disrupt the live site, we took a backup and installed a copy on the development system to further customize the site. During the customization process, we ran into some issues. And to isolate the problem, we disabled some plugins to check if the plugins were interfering with the problem.

The problem was, we were using a WordPress plugin called "Post Views Counter" to display views on each post. During the troubleshooting process described above, we also disabled the "Post Views Counter" plugin (or maybe even deleted it from the plugins page in WordPress). Later when we re-installed / re-enabled the plugin, we found the stats have been reset. The post views were all zeros. And we wanted to retain the values.

After the required customization was done, we needed to bring the stats from the "Post Views Counter" to the live site to the development site, before we upload it to the live server. Note: There could have been another way to do this, but we didn't want to take a risk. More on this described at the end of this post.

So here is what we did: export data from a single table and import into a single table using phpMyAdmin.

How to export data from a single table using phpMyAdmin?

To backup only one particular table in phpMyAdmin, click on the particular table and click Export. It will only export the table and not the entire database.

Activities on the live server:
Logged in to phpMyAdmin
Backed up the entire database (just in case needed)
Clicked on the particular table from the left sidebar (ngk_post_views in this case)
Clicked Export
This exported only the table (ngk_post_views in this case) in .sql file


Now that we have the backup of the particular table (ngk_post_views in this case), we need to restore it to the development server.


How to import data from a single table using phpMyAdmin?

To import data from a single table using phpMyAdmin, the process is the same as importing database. BUT, the table you are importing should not exist. Otherwise, phpMyAdmin will throw an error.


Activities on the development server:
Logged in to phpMyAdmin
Backed up the entire database (very important)
Click on the Database
Then select the table we will import, and click drop (table).


The Select T Database Again, Just In Case It Is Not Selected
Click and Import and Select T Backup File of TABLEDownloaded from Live Server


If Every Thing Gets Better, T Import Solda Success (Unless There Are Other Issues, Whitch Bay DD Note Encounter)


We clicked on the table and checked the values and the counts were restored.
View the posts on the site's front end, and we can see the counters restored.
Now that the post view counts have been restored, we have migrated the site to the live server.


By the way, to upload your WordPress website to live server, you can use plugins like "Duplicator". Here is a previous post on -How to use "How to download a website from live server to development local server |   Bangla Tech Jagat


As mentioned above, this could have been achieved in another way.
We could have "dropped" the post views table from the development system of phpMyAdmin and then exported the database. When this is uploaded to the live server, the post views table on the live server database is expected to be as it is. Ensure backups are taken before attempting any of the examples in this post, and at your own risk.


Four FREE Android Phone Manager / PC Suite for Android Mobile Phones | Bangla Tech Jagat


Quite often we end up in need of backing up our smartphone data to our local computer. That is when PC Suite or desktop phone manager comes in handy. Nowadays, we also have cloud storage to backup some of our data but then, cloud storage comes with limited storage if free and of course, it required data connection to upload (better do it on WiFi). And generally, not all photos and videos we took from our phones are not worth uploading all to cloud storage. That would be a waste of our precious space. So the ultimate choice is to store it on our computer or on external hard disks. That's when PC suite and phone manager comes in handy. We can also copy or transfer files from phone to computer and vice-versa just by using USB cable but having a PC Suite helps us in doing more with our phone than just transfer files.  In this post, we shall see top five FREE PC Suite or phone manager software for Android smartphones.
Some phone manufacturers provide their own PC suite. We may fondly remember Nokia PC Suite as well from those days. Others include Samsung's Kies, Mi Phone's Mi PC Suite etc. But if your phone manufacturer did not provide a PC suite software or if the pc suite software is not working as expected, you can try any of the below free desktop Android phone managers to manage your Android phone from a computer.

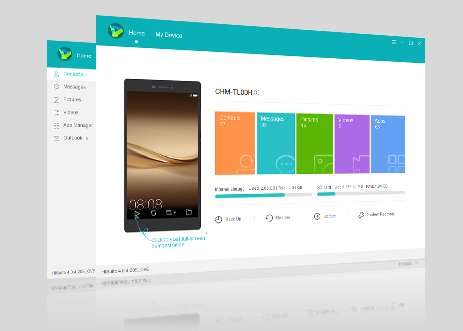
Hi Suite
HiSuite is a PC suite software by Huawei. This pc suite works well for managing Android phone. The software has an easy to navigate and clean interface. HiSuite is available for free.
Source: http://consumer.huawei.com/minisite/HiSuite_en/
Features of HiSuite:
App Management

View, install, uninstall and update your Android phone apps right from the computer

Contacts Management

Add, delete, edit, export, import and manage contacts from your computer

Messages

Send, receive, manage and export right from your computer

Images and Videos

View, Manage, Import, Export photos and videos from phone to computer or vice-versa.

Phone software update

Update phone system updates conveniently from your computer

Screenshot

Take screenshot of your Android Phone screen from your computer

Data backup and restoration

Back up important data on your phone, such as your contacts, messages, apps, pictures, videos, songs, call logs, emails, and agendas, to a computer.

Restore your backup data with ease

 Note: Backup and Restore will work only for Huawei Phones.
Download HiSuite - Android Smart Device Manager
Moborobo
Moborobo is another free Android phone manager tool to manage your Android device from the comfort of your desktop computer to manage all of the content on your Android device, make backup copies of content on the phone. You can install, uninstall and update Android Apps directly from the program's interface. Just like most desktop phone managers, it can manage music, photos, videos, ringtones, wallpapers, and other multimedia on the phone right from computer.
Moborobo pc suite software also projects the current display of the Android device connected on the software. Controls are available with which you can easily take screenshots of the display if required. The user interface is clean and easy to navigate.
The software also includes a file and app manager, and with it you can manage everything right from the desktop. You can also create a complete backup of your device and restore.  The also also supports Wi-Fi connectivity in case you find USB cable connections annoying.
Download Moborobo
Mobogenie
Mobogenie is another desktop Android phone manager that is worth mentioning. Like any other desktop phone manager, it allows managing of contacts, messages, apps and file explorer. You can also create backup of the device and restore. 

Mobogenie also offers one-click root access for supported devices and with it you can uninstall stock apps, save battery usage and generally do whatever you want.
Download Mobogenie
Droid Explorer
Droid Explorer is a full Android PC Suite along with the familiar Windows Explorer UI experience. Along with all simple tasks like SMS Backup, Phone Backup, Contacts Optimization, Photo & Videos Management, this software also lets you fully exploit your Android Device.

Download Droid Explorer
While in the context of Android phone management from computer, the free software discussed are quite sufficient but in case if there are certain features that you want and are not available, you might also explore other paid versions listed below. But personally, I feel that the free ones also has sufficient features for management of Android phones from computers.
Other paid Android Smartphone managers. Click on the links to know more.
1) AirDroid
2) MyPhoneExplorer
3) Wondershare MobileGo for Android

Google Search

The Web Only Soulsbox